|
travel@pangolin.liNamibia 2003
|
 |
 |
www.pangolin.li
home Travel
directory Travel
directory Namibia 2003
Main
Part 1 Etosha
Part 1a
Animals Part 2
Otjitotongwe Part 3 Highlands Part 4 Van Zyl's P. Part 5 Marienfluss Part 6 Kaokoveld
Part 7 Damaraland Part 8
Twyfelfontein Part 9 Namib Part 10 Wolwedans Part 11 Gamsberg Panorama pics Namibia '03 Gallery
Namibia 2003
Main
Part 1 Etosha
Part 1a
Animals Part 2
Otjitotongwe Part 3 Highlands Part 4 Van Zyl's P. Part 5 Marienfluss Part 6 Kaokoveld
Part 7 Damaraland Part 8
Twyfelfontein Part 9 Namib Part 10 Wolwedans Part 11 Gamsberg Panorama pics Namibia '03 Gallery |
|
contact last updated: 30-Jul-2005 Text/pictures subject to copyright by pangolin.li |
 |

 |
||||||||||||
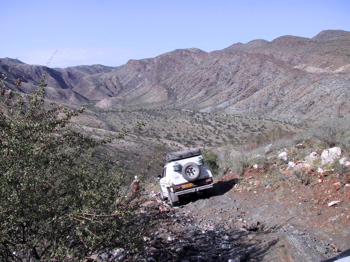
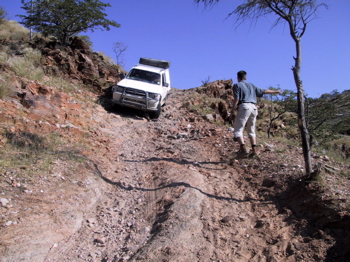
Part 4 - Van Zyl's PassTravel detailsThis part covers only the short route between km 139 (Otjitanda) and km 164 (end of Van Zyl's Pass) - but these 25 km took an afternoon and a morning! For our route from Otjitanda onwards to Sesfontein we had GPS coordinates from Wouter Brand, and used The Shell Map of Kaokoland (Kunene Region), 1:625 000 (issued 1996) which proved not 100% accurate but gave enough information. Check also the main page for more info on maps and books about Namibia.Contact me if you'd like to get our GPS data of this trip. And do check out our Namibia '03 photo Gallery. 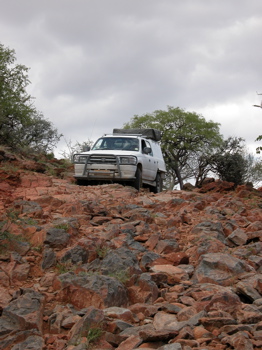  Van Zyl's PassVan Zyl's Pass is what would, in Switzerland, be considered a path fit for chamois and capricorns, or some intrepid goats. Even hiking paths in Switzerland are easier manageable. So imagine a steep path full of rubble, bigger and smaller rocks - and imagine your car going down there. The first and the last part are quite steep, but there are easier stretches between.So there are a few points to consider when taking on the Van Zyl's Pass challenge:
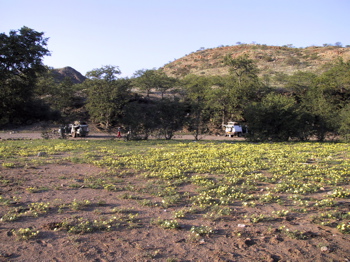
There are two ways around Van Zyl's Pass to Marienflusstal and Hartmann's Valley, if you don't want to take this challenge: Either from Opuwo via Kaoko Otavi, Omutati, Orupembe and Rooidrum (Red Drum), or else from South via Sesfontein and Purros to Orupembe. Both roads require 4x4, but are much easier to manage also for the 4x4 novice. Also Marienflusstal and Hartmann's Valley offer remote, but good sand tracks. However, if you decide to use Van Zyl's Pass, you're rewarded with a lot of 4x4 adventure, a rugged and remote landscape, interesting flora (we didn't see much fauna). We chose a REALLY beautiful camping spot (km 157, S17 47 01.5 E12 57 47.4): A quite large green meadow suddenly appearing between all those rocks, dotted with yellow devil thorn flowers, high shady trees and a low hill sheltering us against the wind. The ideal place for a late afternoon nap in a hammock, a chat with a herdsman who appeared out of nowhere, a good braai and a very very quiet night. Check out the Panorama site for an another picture.
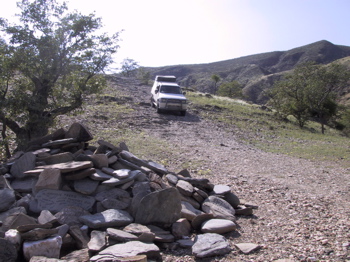
We rose with the sun next morning for the last piece of the pass. At km 161 we met the two other cars, on a similarly stunning camping spot: After driving in more or less narrow valleys until now, here the path opened and gave a scenic view over the hills and valleys to the West. Must have been a spot for a gorgeous sunset, but was also quite windy. The last piece, after this viewpoint, was the worst, but soon after we arrived at the heap of stones that marks the end of Van Zyl's Pass. Don't forget to bring a waterproof pencil (also nail enamel will do, should you carry this here) so that you can leave your mark on one of the stones. Don't leave a mark elsewhere.
More pics can be found in the Namibia '03 Gallery Go to:
|
||||||||||||
 |